Knowing how to use an orbital sander means that you can get the best finish on wood, metal or plastic. Whatever sanding project you are taking on you need to take control of your sander for it to work effectively. You don’t want ugly swirl marks, pits, or unwanted rounded corners.
The whole purpose of sanding is to get a smooth, even finish and thebest orbital sanders可以帮助做到这一点。然而,在我们rthy power tool you need the right techniques to help achieve your goals. Here we guide you through the must-know basics and common mistakes that you need to avoid.
How to use an orbital sander: the basics to get you started
For those wonderingwhat is an orbital sander– or a random orbital sander, as this tool is sometimes know – and how it differs from other sanders, then it's key to say the defining feature is the round pad. This accommodates a circular sandpaper disc and as such, this hand-held power tool is used to sand surfaces in a circular motion.
An orbital sander is a forgiving power tool, but there are still a few simple steps to follow to get the most out of it. Here we run through the basics that you need to know to get started.
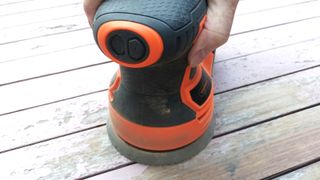
1. Add a sanding disc
Before you can start sanding you will need to attach a suitable sanding disc. Orbital sanders typically come with what is known as a hook and loop system. This is similar to velcro, making it easy to add and remove sanding discs.
Line up the holes and edges, press on the pad and make sure it's secure. Check out oursandpaper gradesguide to determine what you need for different projects.
2. Attach a dust bag
Orbital sanders have a dust outlet that directs dust away from the sander. To collect the dust and stop it spreading everywhere add a dust bag or attach to a vacuum. Most orbital sanders will come with a dust bag included.
3. Secure surface
If you are sanding a loose piece of wood or other material you need to secure it in place so you can sand without the material moving. You can use clamps to secure it to a work bench or table. Alternatively push against a solid surface such as a wall or get a second person to help hold the material.
4. Start up and sand
Place the orbital sander on the surface of the material you want to sand and switch on. This helps ensure that the sander starts flat and lessens the chances of the pad edge digging into the surface.
Keep the sander flat and sand with the grain where possible as this will give a better finish. One tip to make sure you are sanding wood evenly is to mark the top of the surface with light pencil strokes. When they disappear you can move on to the next section of the surface until all the marks are gone.
5. Finish, inspect and clean
When finished, switch off the sander and lift off the surface. Give the surface an inspection to make sure it is as you want and doesn’t feature any marks. Empty the dust bag and wipe the sander clean with a dry cloth.
Six common mistakes DIYers make when using an orbital sander
It's easy to get carried away when using a new power tool, but you need to let the sander do the hard work. Follow the simple rules below to get the finish you want.
1. Don’t press too hard
When using a power sander there is often the urge to add more pressure to the pad and press down. While this technique might work whensanding wood by hand,it's not an effective solution when using an orbital sander.
You don’t need to push down, the weight of the sander and you holding the sander is enough for the sander to do its job effectively. If more than necessary pressure is added it can lead to unwanted swirls on the surface.
2. Keep it flat
It’s a pretty simple mistake to make, but to get the best finish you need to keep your orbital sander pad flat. This helps ensure that the surface stays flat when you have finished sanding. Don’t spend too long in one area — try to sand evenly across the whole surface.
When sanding near edges and corners it's especially important to keep the sander flat otherwise you’ll end up with rounded corners. One quick tip is to only allow 20% of the pad edge to go over the end of the surface. This greatly reduces the chances of any rounding.
3. Stay slow
There’s no need to quickly move an orbital sander along a surface. The sander is doing the hard work so move slowly, and this will help reduce any marks on the surface.
4. Line up sanding disc holes
It’s not critical that you line up the holes in your sanding disc with your sanding pad, but they do serve a purpose and as they are already there it makes sense to make good use of them. Lining up the holes helps channel the dust into the dust bag and stops the build up of debris on the sanding disc, giving the sandpaper a longer sanding life.
5. Go with the grain
When sanding wood, going with the grain gives a smoother finish. Going against the grain will raise the wood grain, which is more noticeable when you varnish or stain the surface. It's not critical that you go with the grain if the surface is to be painted, but it is helpful.
One tip is to sand straight up the grain – from bottom to top – and then do another strip but overlap by around 50% of the strip you have just sanded.
6. Replace your sanding discs often
Sanding discs are relatively inexpensive so it's a good idea to invest in a large batch of good-quality sanding discs in various grade, like these100pcs 125mm Sanding Discsfrom Amazon, as soon as you get your orbital sander.
When you notice that the disc is not working as well as when you started using it or there is a build up of dust and debris on the disc, it's time to change.

Why does my orbital sander jump?
可能有几个原因,包括sanding disc is not attached properly to the pad, the speed is too high on a variable speed orbital sander or you are working on an uneven surface which is causing the sander to tilt and dig into the surface.
