Are you ready for a mega-project? Figuring out how to lay parquet flooring – in a herringbone pattern no less) – is one of the most challenging DIY tasks you can tackle (at least in this writer’s experience). But ultimately, it can also be one of the most rewarding.
Parquet flooring is a floor made up of hardwood pieces (which we’ll call ‘woodblocks’) arranged in a decorative pattern. It's one of the most populartypes of wood flooringdue to its elegant and intricate appearance. However, it's also one of the most difficulttypes of flooringto lay on a DIY basis.
In this guide, I’ll show you how my partner and I laid a classic ‘herringbone’ pattern of alternating, interlocking columns of rectangular woodblocks. Working as a team of two, we laid our reclaimed oak parquet floor gradually, over several months. Keep reading to find out how we did it.
How to lay parquet flooring
The first step in this DIY process is preparation. At this stage, it’s a good idea to gather all the tools and materials you'll need to lay your herringbone floor.
If you're wonderinghow much does wood flooring cost, it's worth remembering that you'll need quite a few different tools to complete this DIY project on top of the woodblocks themselves. Here’s the full list of items that we used:
- Reclaimed oak woodblocks (I bought ours fromWood_Job)
- Bostik Cempolay Universal Primer
- Paint roller and bucket
- 铅笔
- Set square
- Laser level
- Bostik Laybond Wood Adhesive
- Paint stirrer
- 切口镘刀
- Triangular trowel
- Old takeaway containers and scrap plastic for tidying adhesive
- Kneeling pads
- Safety gloves
- 防尘布
- Small bucket for tool cleaning
- Methylated spirit
- Mitre saw
- Jigsaw tool
- Scrap paper
- Osmo Interior Wood Filler
- Wood filler knife
- Electric sander tool with selection of sanding discs (40 grit and 80 grit)
- Osmo Polyx-Oil
- A fairly broad paintbrush
- White spirit
Step 1: Preparation
Did I mention that this is a mega DIY project? Ok, let’s take a deep breath and get started. First, I had a layer of self-levelling compound poured into the room, to create a subfloor. This forms a more or less even surface upon which the floor can be laid. If you already have a smooth, level subfloor, you won’t need to do this.
I then applied a primer to the subfloor, to promote adhesion between the subfloor and the parquet. After thoroughly vacuum-cleaning the subfloor, I dilutedBostik Cempolay Universal Primerwith water in a bucket (as per the maker’s instructions), and worked the primer into the entire subfloor using a paint roller.

Step 2: Laying the whole woodblocks
Now you have primed your floor, the next – and arguably the most important – task of laying a parquet floor is setting out the pattern correctly. Here are the individual steps we followed:
1. Mark the floor with a centre line, from which the herringbone pattern will spread across the room. Rather than starting the pattern from the top corner of a hardwood piece, start through the actual centre of the pattern as shown, so that the pattern spreads evenly from the centre. Remember, the small triangles of wood to the left and right of the line should be of equal size.
2. Draw parallel lines either sideNext, add one additional parallel line on either side of the centre line, to show exactly where the two bottom corners of each piece of hardwood will go.
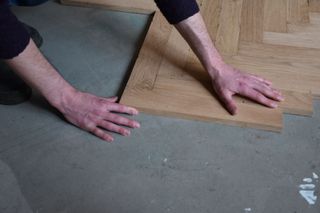
3. Dry lay the blocks用你的三个准则,制定一些啊f your woodblocks (about six will be enough), in a herringbone pattern. You can check that the pattern is correct by holding a set square against the bottom of the arrangement.
4. Stick the woodOnce you’re happy with your pattern, you can start sticking the wood to the floor. Remember to wear your safety gloves for this, and for all other steps involving materials which are not skin-safe. Dollop someBostik Laybond Wood Adhesiveonto the bottom of each hardwood piece using a triangular trowel. Then, spread the adhesive across as much of the surface of the piece as you can, using a notched trowel. Finally, stick the piece down on the floor. Repeat with each piece until you’ve laid a whole column – and then repeat the process across the room.
Laying your whole woodblocks will probably take you several days. In between sessions, clean your trowels as thoroughly as possible using methylated spirits, a rag and small bucket. Also, take care to clean up any spilled adhesive from the floor around your laid woodblocks.
Step 3: Edge pieces
The woodblocks around the edge of the room will need to be cut to size, so that they can fit against the wall and around obstacles.
To do this, I used a ruler and pencil to measure and mark up the edge woodblocks, and then cut the woodblocks using amitre saw. You may want to write a code number on each piece, and on its corresponding area of floor, so that you don’t lose track of which piece goes where!
Once you’ve cut your edge woodblocks, you can lay them with adhesive as normal.
Step 4: Filling and sanding
If, like me, you are not a master floorer, it’s likely that you’ll have gaps between some of your woodblocks, possibly resulting from slight irregularities in your materials, subfloor or laying technique.
These gaps can be filled using a product such asOsmo Interior Wood Filler(I used two colours: ‘antique oak’ and ‘black’). Simply mix the filler with a little water, and apply it to any gaps, or nail holes in reclaimed parquet, using a filling knife. Be sure to add masking tape on either side of large gaps, in order to reduce the amount of mess that will need to be sanded later.
Once your filler has set, you can startsandingthe floor to get it perfectly smooth and level. Using an electric sander, sand the entire floor with 40 grit sanding sheets. Your aim is to make the floor even, so that the steps between hardwood pieces are barely noticeable, and filler is smoothly integrated into the wood. Finally, you can go back over the floor with a finer sanding sheet (80 grit or higher) to make the surface lovely and smooth.
Forsanding floorboards, I use a selection of cordless electric sanders, with an ample supply of lithium-ion batteries charged and ready to go. However, you might be able to work quicker using a rented, contractor-standard floor sander. Either way, this is a massive task, so be sure to set aside several days for sanding. You’ll also need to put on a mask, and cover everything you can with a dust sheet, before you start sanding. And remember to hoover up very thoroughly once you’ve finished.
Step 5: Finishing your parquet floor
After all the strife of sanding comes the immensely satisfying task of finishing the parquet floor. To do this, I painted two layers of Osmo Polyx-Oil onto the oak, taking care to paint with the grain of each piece of wood. You’ll need to clean your paintbrush with white spirits between applications.
The Polyx-Oil hardens the surface of the wood, and gives protection against common stains. What’s more, it brings a beautiful depth to the colours of the oak.
Finally, we could step back and appreciate the work we’d done. Much like the living room, we were absolutely floored!
What is the best way to lay parquet flooring?
There are various ways to lay a parquet floor. We can divide these methods into two categories: fixed or floating.
A fixed floor has all its pieces attached firmly and permanently to the sub-floor – as was the case in my DIY project. A floating floor is made up of pieces that are tightly connected to each other, but which are not stuck to the subfloor. Fixed floors tend to be more secure, whereas floating floors are easier to lay.
Is parquet flooring difficult to lay on a DIY basis?
Is it a job best left to the professionals?
Is it difficult to lay parquet flooring? Yes, it is. Is it possible for a DIYer? Just about. Was it worth it in my experience? Without a doubt.
With that said, if you are short on time and you have plenty of money to spend on hiring a professional, you may find that leaving this job to a flooring specialist is your best bet. There’s nothing to say you can’t lay the floor yourself, and then bring in a professional to do the sanding and finishing – or vice versa.
What is the best way to stick down parquet flooring?
A fixed parquet floor should be laid using a wood adhesive that’s appropriate for the type of wood you’re using. Wood adhesives often have a strong, overpowering scent, so I’d recommend keeping the windows open while using this type of product. At least it’s an upgrade over the bitumen adhesive commonly used to lay floors until around the millennium, which was prone to cracking and sometimes contained asbestos!
Can you create a herringbone floor with laminate?
In this DIY project we used reclaimed oak woodblocks to create a beautiful herringbone effect. However, when it comes to the question ofwood flooring vs laminate, a herringbone effect can be achieved with either material and there are pros and cons to both.
通常你会选择成本and durability. Out of the two, laminate is more cost effective and widely regarded asthe best flooring for kitchens. However, for hallways or living rooms, it's tough to beat the warmth and charm of real wood.