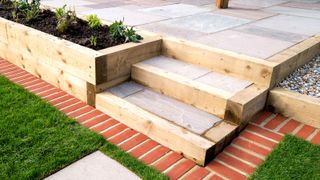
Knowing how to lay garden sleepers will help transform your outdoor space. They are versalite, easy to work with and being made of wood they fit naturally into a garden. Whether you are adding subtle edging to paths, building raised beds or creating steps up to a patio, garden sleepers are a quick and striking solution.
The beauty of sleepers is their flexibility and any DIYer will be able to incorporate them into theirgarden designwithout too much of a struggle. Here we give you the lowdown on how to lay garden sleepers, what types are available, what tools you need and how to keep them looking good and ensure they last longer.
如何把花园睡者:一个循序渐进的指导
Before you begin, there's a couple of key materials and tools you'll need to complete the task. Alongside the sleepers you will need a spade, spirit level, landscaping screws and whatever material you choose for the base. Depending on your project, you may also need a saw.
1. Clear your space
决定在哪里把你的睡眠后,明确the ground of any vegetation, grass and debris with a spade and dig a shallow trench a little wider than the width and length of your garden sleeper.
2. Level and lay base
After digging the trench use a long spirit level – like theSilverline SL22 Spirit Level from Amazon– and level the ground out as best as possible. It doesn’t need to be perfect but the more level it is the better. If you are using sand as the base, add and level out.
If using gravel or hardcore, add, level out and use a tamper like thisRoughneck Contractor's Tamper from Amazonto compact the base.
3. Add your sleepers
Lay down your first sleeper – start with the longest – and use a spirit level to make sure it's level. If needed, add a little extra sand at one end to level out.
Now lay the next sleeper and again make sure it's level with the first. Depending on what you are building, the second sleeper may be laid directly on top of the first, or laid in a staggered fashion.
Ifbuilding raised garden bedsor adding steps, you will likely need to cut a sleeper to size. Use a hand saw or power saw such as a mitre saw. Butt the edge up to the first sleeper and check its level. Keep adding sleepers until the first level is finished and again, make sure they are level.
4.连接和安全你的睡眠
To secure the sleepers into place you can use screws and brackets. If building a raised bed or similar where two sleepers meet, use two long landscaping screws – 30-40mm from top and bottom – to secure them together. Repeat for all ends where sleepers meet. To make them more secure you can use L-shaped corner brackets, too.
Once the first layer is in place you can start stacking and securing. For added security use flat joining plates to connect each level. You can also use railway sleeper brackets like theseRailway Sleeper Brackets from Amazonto secure to the ground.
5. Finish and treat
Finally, when all your sleepers are laid, think about giving them a quick sand –use an orbital sanderif you have one – and treat with exterior wood/deck oil or a wood preservative.
What types of sleepers are available?
Garden sleepers are made of wood and there are effectively two types: hardwood and softwood. Both are suitable for garden projects but have their pros and cons.
Softwood sleepers are more cost-effective and lighter, making them easier to manoeuvre, cut and lay in place. But, depending on species, they are not typically as durable or hard-wearing as hardwood sleepers. If using softwood sleepers, think about purchasing pressure treated sleepers.
How do you prepare the ground for sleepers?
This depends on what you are building with the garden sleepers. But as a general rule if you are only going to have one or two sleepers in height there isn’t much preparation needed. You can place sleepers straight on the ground if you wish, but you will need to clear any vegetation or grass and make sure that the ground is levelled out before laying them.
另外,if the sleepers are going to be higher than two sleepers you will need to do a little more preparation. The ground will need to be clear, level and have a solid base in place.
What is the best base for garden sleepers?
If you want your garden sleepers to remain steady and secure you want to place them on a solid surface such as concrete, gravel or hardcore, but you can use sand as a base as well.
Concrete involves more work, so a popular choice is to use compacted gravel or hardcore. This provides a solid base and offers good drainage. If you are only building one or two levels of sleepers, sand laid over soil is a solid base. Whatever base you use just make sure it's level.
Do sleepers need to be cemented?
Sleepers do not typically need to be cemented in place if they are being laid horizontally. As long as they are placed on a solid level base they will be fine.
However, if you are using sleepers to build a wall or similar – meaning that they will be vertical – you need to dig foundations and cement the sleepers into place in a similar fashion tohow you put up a fence.
How do you stick sleepers together?
There are several options for keeping sleepers in place. Small posts either side of a sleeper can keep them in place. However, a more secure solution is to use landscaping screws like these150mm Heavy Duty Railway Sleeper Fixing Screws from Amazon.You may need larger screws if you have thicker sleepers.
An alternative is to use L-shaped corner brackets like theseSleeperFit Extra Strong Timber Railway Sleeper Corner Brackets from Amazon.Or combine these with the screws for a more secure finish.
How do I stop my sleepers from splitting?
If you are using new timber sleepers they will benefit from being treated with a wood preserver or an exterior wood oil likeOsmo Decking Oil from Amazon.Both will help maintain the wood and repel water which will help prevent the sleeper from rotting or splitting.