Why learn how to lay block paving? Because it can transform a driveway or path into a good-looking, long-lasting feature that will improve the kerb appeal of your house and add value to your home.
Block paving is onedriveway ideato get a strong, durable finish that won’t fall apart in a few years. But you will need to get your preparation right. No-one wants to see weeds creeping up through the gaps, or loose bricks becoming a trip hazard.
Here you'll find expert advice from builder Chris Longhurst, how to prepare for block paving, how to lay block paving and how much you should expect to pay to do it yourself and call in a professional.
How to lay block paving: Before you start
Before you start you want to plan ahead to give yourself a good idea of where your paving is going and help you work out the size of the area to be paved.
Start by sketching out a rough map of the area you want to be paved and take some rough measurements of the areas. This will help give you an idea of what the area will look like and help determine how much material you are going to need.
Measure the width and length of the area to give you the square metres you are going to need. A small driveway will be around 20m2. Add around 10% extra for wastage and breakages.
Before you start it's also worth checking to see if you needplanning permission for a driveway. It is unlikely, but if you are laying a certain type of paving slab that doesn’t let rainwater drain properly and it's over a certain size you might need to. Check the governmentsPermeable surfacing of front gardens guidefor more information
Step-by-step guide
Checking you have the right equipment
Before starting, check that you have enough materials and the right tools. You will need a spade, wheelbarrow, tape measure, spirit level, a rubber mallet, a rake and a broom.
1. Prepare the area
Mark out the area you're going to block pave with pegs and string or use a line marker spray. Add an extra 30cm around the border to make sure you get a good fit. You can fill with earth and turf when finished if needed.
Get a spade if dealing with a small area, but if you are looking to dig out a driveway you want to hire a mini excavator/digger. There’s going to be a lot of earth to move so make sure you’ve got a clear area to dump the earth.
你需要挖多深呢?建造者克里斯Longhurst reveals what you will need to do. “Excavate to a depth to allow 100mm of subbase such as crushed limestone known as MOT type 1, 50mm of sharp sand and the depth of your block pavers which vary in depth”. This will typically be somewhere between 150mm-200mm. Also create a gradient that drops 10mm every 600mm to allow for drainage.
2. Add edge blocks
You add edging to help create the frame for your block paving. The edging blocks will need to be cemented in. Make a mortar mix of one part cement and five parts sharp sand and use a tight string and pegs as a guide for height and a straight edge if included in your design.
Lay down the mortar at around 100mm thick, make sure that it's deep enough that the top of the edge block is around 25-30mm above the string guide. Tap down with a rubber mallet until level with the string and use a spirit level to ensure that block is level. Add mortar on the outside edge – around half way up the block – to hold in position.
Once dry you can lay a membrane to suppress weed growth. Longhurst suggests that, “A membrane is advisable but not necessary”.

Chris is a full-time Staffordshire builder who has more than 40 years of experience in the construction industry. He has his own YouTube, Instagram andTikTokchannels with nearly 50K subscriber that provide how-to videos to aid builders and DIYers undertaking building tasks around the home.

3. Introduce the sub base and sand
Now add the base as Longhurst explains, “The blocks are laid on a sub-base of crushed limestone at a 100mm depth that has been well compacted. Then a 50mm layer of compacted sharp sand. Sharp sand is prepared and is more durable.”
Use a MOT type 1 Subbase like thisMOT type 1 Subbase From B&Q. Add a 75mm layer of sub base and use a rake to even out, then compact. Then add another layer and compact again so you have at least 100 mm of compacted sub base. You can compact by hand with a hand held compactor, but you will get a better – and quicker and less back breaking – finish by hiring a compactor/wacker plate like thisWacker Plate Compactor from B&Q. Go over the sub base four or five times to ensure that it's properly compacted.
Now lay down the sharp sand - make sure it's damp so it compacts properly. A quick test is to squeeze the sand in hand and if it stays together you're good to go. Now spread and even out with a rake and compact. Start with a 50mm layer, compact and repeat until you get your 50mm of compacted sand.
To finish you need to lay a layer of screed, which is effectively non compacted sharp sand. Use screed lats aka rails or guides, either side of the area you are laying the screed. Lay the screed and level out with a long piece of wood that reaches both screed lats. This should be around 3-5mm above the edging block as the block paving will be compacted down when laid. Use pegs and string as a height guide.
4. Lay your block paving
Start in a corner and start laying your pavers one by one in the pattern you’ve decided to use. Sit behind the pavers and lay so you're not disturbing the sand and screed. Work across the width of the drive or path and then back across, so you are always keeping a straight edge and you will have a surface to kneel on to lay the pavers. To help keep the pavers even when laying, push against the existing paver and lower the paver. This helps stop the edges digging in.
你会留下空白的边缘,尤其。公众y if you have curved edges. Next to the edge you install a set of side blocks that run parallel with the edging blocks all the way around. Place this against the edging block and over the paver you have already laid.
Mark the paver, pull up and cut with a block splitter and replace. You will now have a complete side block and a clean cut on your paver for a neat fit. Repeat around the whole of the edge until you have all side blocks installed and pavers cut to complete your driveway or path.
5. Finish-up
Get a bag of kiln dried sand like thisTarmac Kiln dried Paving sand from B&Q, and spread over the drive or path and sweep into all the gaps. Repeat until the area is completely filled. Make sure no gaps are missed. Finally, go over all the pavers and side blocks with a wacker plate to compact the pavers.
FAQs
What are the common block paving patterns?
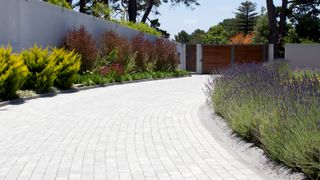
There are a lot of different block paving patterns but the most common ones are Herringbone, Basketweave, and Stretcher bond. Herringbone is seen in the image below. Stretcher bond is a simple pattern that mimics brick walls with a brick overlapping the brick above or below by 50%. Basketweave has two bricks running horizontally next to two bricks running vertically.
How much does block paving cost?
This depends on what type of block paving you want for your path or driveway. A common choice is brick paving like thisDriveway Red Block paving from B&Qwhich costs £26.50m2. This is relatively cheap block paving with other types such Brindle block paving costing almost twice the price. But as a guideline expect to spend anywhere between £25-£100 per square metre.
A small path is around 5-10m2, while a small driveway is around 20m2, while a larger driveway will be around 50m2. So a 50m2 driveway with paving that costs £50m2 means you will be paying £2500 for the pavers only.
Beyond the costs of just the block paving you will need to consider the cost of edging, subbase, sand – and labour costs if not doing it yourself. There’s a lot of factors to consider when working out costs but expect to be paying a minimum of £5,000 for a 50m2 driveway if doing it yourself.
How much does it cost to call in a professional?
If you are laying block paving that is straight and has a relatively simple pattern – and you have all the tools needed for the project – and you think you have the DIY skills to make it happen then go ahead and get started with our guide.
However, if you are looking to lay a large area of block paving that is more intricate with curves, we suggest that you consider getting in a professional to tackle the job. You should expect to pay £250 a day for labour. If it’s a smaller job you may be charged by the square metre, which will be around £100. Get a fixed price before they start.
What other block paving costs might I need to pay?
If you have old block paving that needs removing before new block paving can be laid you have two options. You can save yourself a lot of money by doing it yourself, but if you need to get a professional in it will cost you around £70-£80 per square metre.