In go the cooking fumes; out comes pure air. That’s the basic idea of a recirculating cooker hood.
These home-enhancing appliances use a fan to suck in the air from your cooker, pass it through filters to remove moisture and food particles, and then release the purified air back into the kitchen. This reduces the levels of odour, moisture and unclean particulates that are released into the home during cooking.
The recirculatingcooker hoodsthat we’ll focus on in this guide do not require extensive ducting or an outlet. As long as you regularly clean or replace the filters (as specified), a recirculating cooker hood will greatly improve your air quality and the cleanliness of your kitchen.
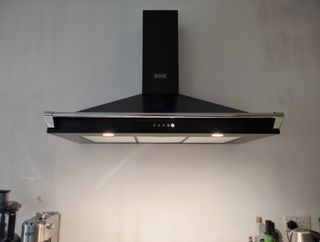
Here’s how I went about installing a highly-rated recirculating cooker hood: theStoves Richmond 100PYR Pyramid Chimney.
How to install a recirculating cooker hood
Recirculating cooker hoods work differently to extracting cooker hoods. Extracting models tend to provide an even greater improvement to air quality, as they entirely remove cooking fumes from the building, via ducting and an outlet on the external wall. However, extracting cooker hoods can be expensive and awkward to install – especially if your cooker is far from an external wall.
Recirculating cooker hoods are comparatively affordable and can be fitted using a relatively small selection of commonplace DIY tools. How long it takes to fit a cooker hood varies depending on the model of hood, and how fast you work. I’m a slow DIYer, and I installed mine in about 3-4 hours.

1. Choose your cooker hood
So, you’ve made the trouble-saving decision to install a recirculating cooker hood, rather than an extracting model. Good choice! Now you’ll need to select the right model for your kitchen. Think about:
Type– there are many differenttypes of cooker hoodsto suit different kitchens. These include chimney, island, ceiling, canopy and downdraft.
Width– the hood should be at least as wide as your cooker.
Features– e.g. multiple fan speeds, boost modes, smartphone operation.
Style– classic or contemporary?
2. Gather your tools
You shouldn’t need much equipment to install a recirculating cooker hood. I used these tools to fit mine:
Cordless combi drill(in hammer drill mode)
Masonry drill bits – multiple widths
Laser level with telescopic pole
Tape measure
Pencil
Ladder
Screwdrivers/screwdriver bits
Rawl plugs (if not supplied)
The exact range of tools you need may vary, depending on which cooker hood you buy.
3. Finding the correct place for a cooker hood
As you’d expect, the best place for a cooker hood is directly over the cooker. You’ll want to align the centre point of the hood with the centre point of the cooker.
You’ll also need to think about vertical placement. The bottom of the cooker hood should be at least 65 cm clear of the hob. If you’re tall, a slightly higher placement is advisable – although if the hood is placed too high, it may become less effective at drawing in cooking fumes.
Also, do make sure there’s a mains socket near enough to power the cooker hood. Ideally, the socket will be on your centre line, so that it can be hidden by the cooker hood chimney.

4. How to wall mount a cooker hood
- First, mark the wall in the places where you’ll mount the cooker hood. Find the centre point of the oven, and draw a line vertically upwards from that point. Next, measure up from the top of the oven and find your chosen position for the bottom of the cooker hood. There should be at least 65 cm of clearance.
- Using your pencil lines for guidance, hold the cooker hood against the wall in the place where it will be fixed. You’ll need help from at least one other person. Now, make pencil marks where the screws will join the cooker hood to the wall.Top tip: trace the outline of the fixing points onto the wall, rather than just drawing crosses. There’ll be plenty of time to choose the exact best place to drill afterwards.
- With the wall marked up, you can start drilling holes. I did this using a cordless combi drill in ‘hammer drill’ mode, with a masonry drill bit. There’s hard brick behind the plaster in my kitchen, so to make the job easier I drilled smaller pilot holes first, then expanded them using a wider drill bit.
- Next, delicately hammer some wall plugs into the holes. You can then ask your helper to assist you in lifting the cooker hood into place, while you fix screws through the cooker hood’s screw-holes and into the wall plugs using a screwdriver. If the cooker hood has multiple sections, repeat this process with each section until the entire appliance is secured to the wall.
With a chimney-style cooker hood, like the one I’ve installed, you’ll need to secure a cowl in-place over the hole in the centre of the main cooker hood section, where the air flows up. Your mains power plug and socket should sit behind or above this cowl. Before covering these components with an additional section of chimney, make sure that the cowl is secure, and switch the power on so that the cooker hood can operate.
Please note that in some cases, you may need to add screws to the wallbeforemounting the cooker hood, so that you can slot mounting holes in the appliance over the screw heads, and then tighten the screws fully.
5. Additional components and filters
You’re almost ready to start using your recirculating cooker hood. But first, check to ensure the relevant filters (charcoal and/or grease) are inserted, and free of excess packaging.
Depending on which cooker hood you buy, there may be other extra components to assemble. For example, I added the rail to the front of mine at this point.
With every part in its right place, you’re ready to start enjoying the benefits of a fume-free kitchen. Why not celebrate with a fry-up?
Is a recirculating cooker hood easy to fit on a DIY basis?
Fitting a recirculating hood is a moderately difficult DIY task. There’s a good chance you can do the job – but remember, it will usually require two people to safely lift the appliance into position. Extracting cooker hoods are trickier to install. They require installation of ducting and an air outlet on the external wall, as well as fitting the hood itself.
Do you need an electrician to fit a recirculating cooker hood?
Recirculating cooker hoods typically run off mains electricity. You simply plug them into a mains outlet, as you’d plug in most other electricals. However, if your cooker hood comes with bare power wires (there should be three together: live, neutral and earth), then you may need to purchase a plug (like this one) andfit it onto the wires. Check the wattage of the cooker hood before deciding whether to use a 3A fuse or a 13A fuse in the plug.
If you don’t have a mains outlet in the right place to power your cooker hood, you may need to hire an electrician to add a circuit and/or power outlet to the kitchen.
How much does it cost to install a recirculating cooker hood?
Installing your own recirculating cooker hood is essentially free. However, the cost of the tools needed for the task can add up, especially if you don’t currently own a cordless drill or ladder. Investing in these core DIY items will pay off in the long run, if you’re going to be doing plenty of DIY.
The best recirculating cooker hoods
For this article, I fitted a Stoves Richmond 100PYR Pyramid Chimney, which can be used either as an extracting or recirculating cooker hood. Some other great options to consider include:
This excellent cooker hood has 3 different speed settings to give you extraction of up to 610m3/h
" data-widget-price="{"currency":"GBP"}" data-widget-type="deal" data-render-type="editorial">
This timeless design is suitable for every home, as it can be set for extraction or recirculation.
" data-widget-type="deal" data-render-type="editorial">
An affordable cooker hood with 3 speeds and built-in LED lights.
" data-widget-type="deal" data-render-type="editorial">